

I’ve been working out of a booklet called What You Can Do With Jell-O and finally made it to this three-tiered beauty.
The Neapolitan Loaf recipe caught my eye the very first day I flipped through the book, but I needed to work my way up to it by first learning how to make a Jell-O Whip. I would suggest you do the same if you intend to try this one at home.
One of the interesting quirks about 1930’s food – desserts in particular – is the intentional air of elegance. Times were tough during the Great Depression, so recipes needed to be quick and ingredients cheap. But the people were desperately longing for some sophistication in their lives and since they generally couldn’t travel or participate in high society, they found a sense of optimism and refinement through food.
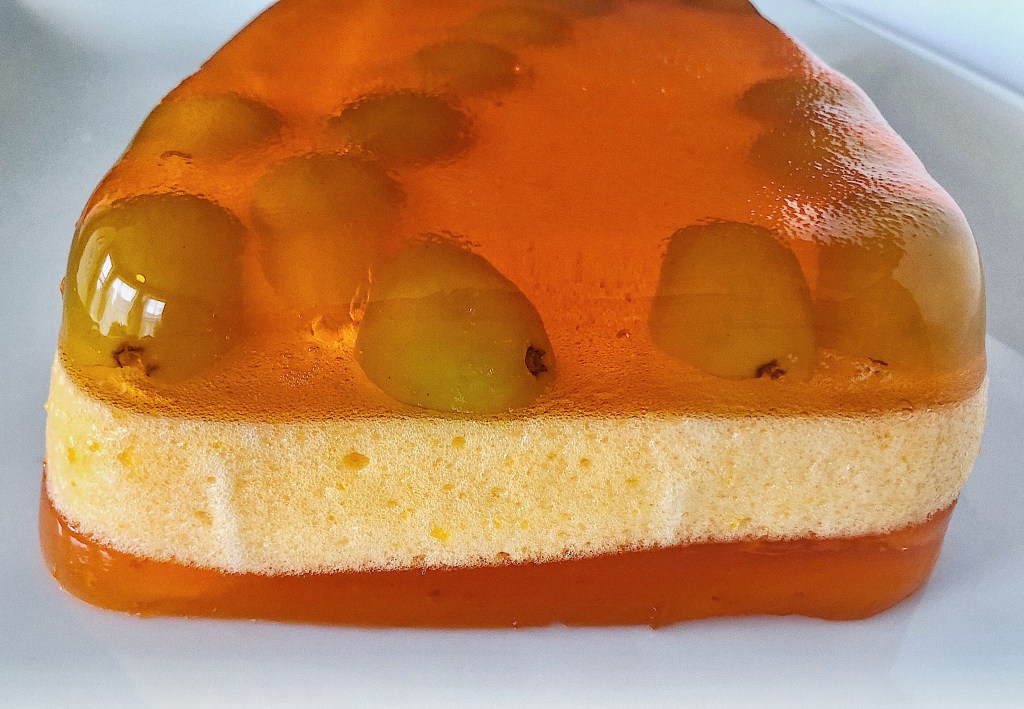
This is why many jello recipes during this time had unnecessarily fancy names like Pineapple Trifle, Fruit Symphony, Jellied Macedoine, New Manhattan, Hawaiian Sunset and Neapolitan Loaf. There’s nothing “Neapolitan” about this jello salad beyond it having three layers. But a chic and exotic name can turn a simple layered-orange-jello-with-grapes into something a bit more dignified.
The Recipe
I have only done one other layered Jell-O but this one took much more time and patience to put together. It was also quite a challenge to photograph! These pictures just don’t do it justice.
In general, based on all the jello recipes I’ve made, the 30’s-era jellies are much less forgiving than the salads of later decades. These are light and very delicate and definitely shouldn’t be manhandled.
I don’t often do detailed step-by-step instructions for jello recipes, but this one definitely calls for it.
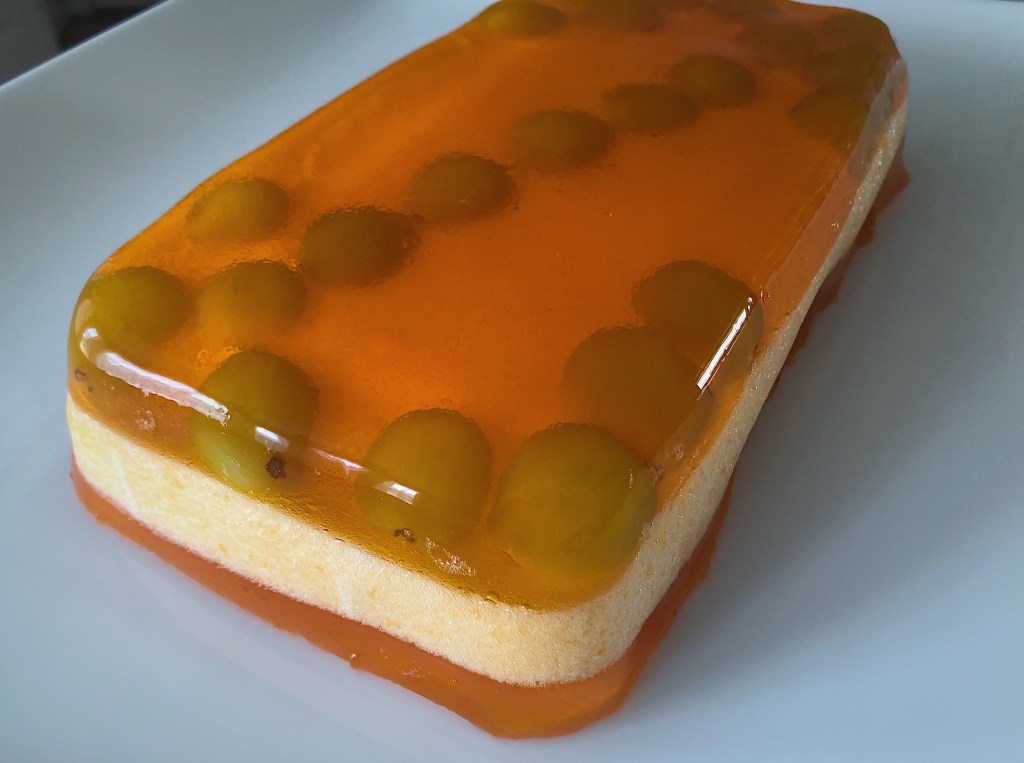
Neapolitan Loaf
Ingredients:
- 2 packages Orange Jell-O (3 oz.)
- 2 pints warm water (4 cups)
- 3/4 cup green grapes, halved and seeded
- 1 orange, sections free from membrane
First Layer
- Dissolve the Jell-O in warm water. There are how-to instructional pages elsewhere in the book, all of which mention that warm water (not hot) should be used for dissolving the jell-O.
- This one is supposed to be molded in a loaf shape, so use a bread pan or glass dish. Metal will help the jello set faster, which is very important here. Pour a little bit of the jello into the pan (about 1/4 inch) and let it set until firm. This might take around 30-45 minutes or so.
- Set aside 1 cup of the remaining jello and put it in the fridge to chill for the second layer. The rest of the jello will need to be cold but you don’t want it to set quite yet. Leave it out or chill, just keep an eye on it and make sure it’s cold and still a liquid by step #5.
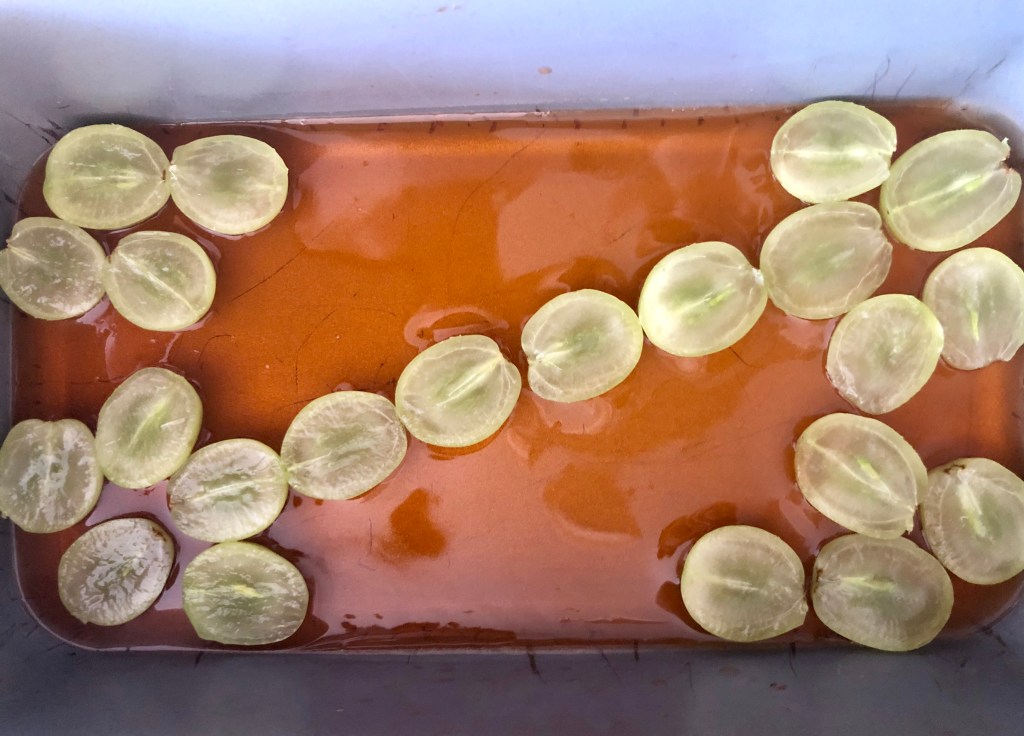
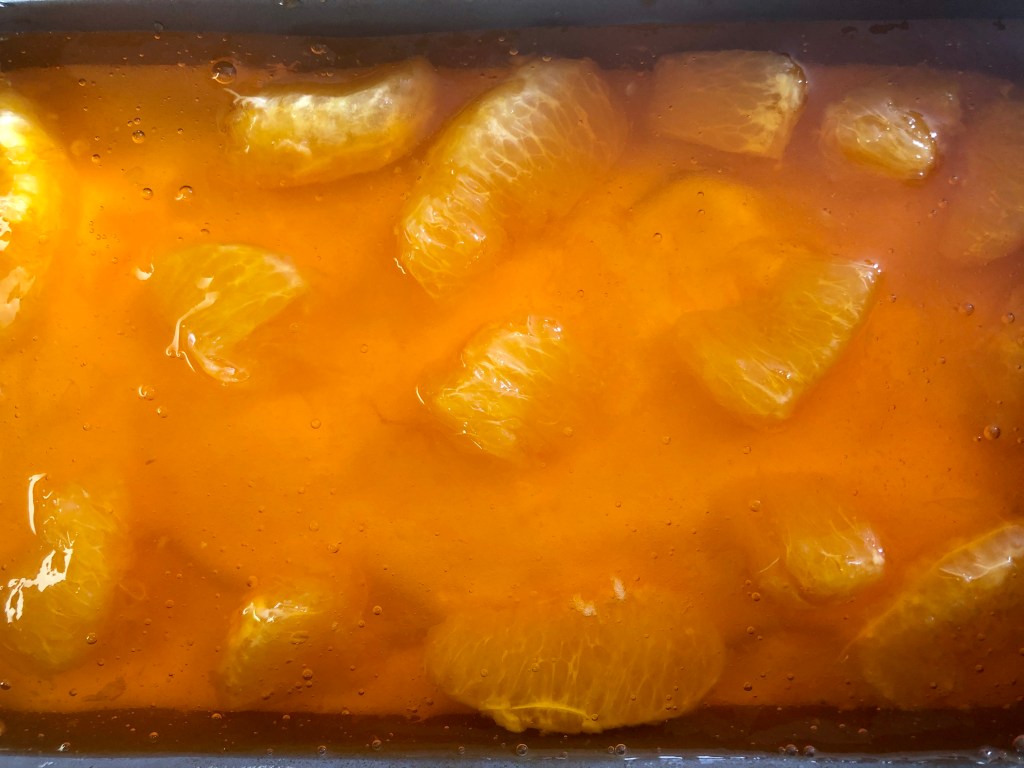
- When the jello is firm, arrange grapes cut-side up in a design. The design I used is actually the one from an instructional page, but you can make any design you want.
- Pour just enough cold liquid jell-O over the grapes to anchor them in place. This should be not quite 1/2 of the cold liquid. Do this very carefully and slowly, and maybe use a measuring cup and spoon to keep the flow to minimum so it won’t upset your design. This is the most challenging step. Chill until set.
- You should still have enough cold jello liquid left in the bowl to be able to make your third layer. Chill until it thickens, but do not let it set completely!
Second Layer
When your reserved 1 cup of jello is a thick syrupy liquid, it’s time to whip.
- Put the bowl in a larger bowl or dish filled with ice water. This will keep the jello cold while you whip it.
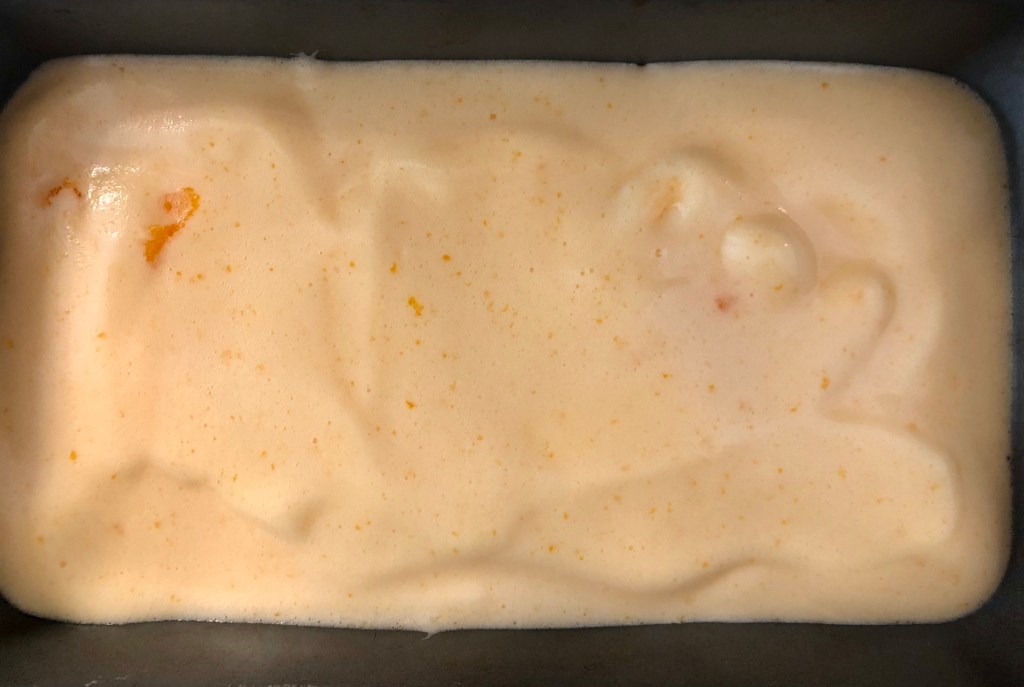
- With a hand blender, whip the liquid for about 6 minutes. It should be thick and foamy all the way through and will become spongy when it’s set.
- Spoon the whip onto the set first layer. Make sure the first layer is firm enough to handle the weight of the second layer and be sure to do this very carefully. Chill until set.
If you need more details, check out the recipe for Strawberry Whip. This was my fourth whip, so I felt comfortable enough with the technique to do it under time constraints. If your first layer isn’t quite set but your whip is done, it can sit out for a little while. Just make sure it stays cold and doesn’t set completely.
Third Layer
When your second layer has set (30 minutes seems about right), prepare the rest of the jello mixture that has been chilling all this time.
- By now the remaining jello should be cold and partially set, but not firm.
- Add your orange pieces and fold them into the mixture. You may use navel oranges or a smaller variety like clementines and I’m sure there is no issue with cutting them into smaller pieces. Just make sure you remove all of the membrane. I used a navel orange.
- Carefully pour/scoop the fruited jello onto the whipped second layer. Gently spread it around so your completed loaf will be level. Chill until set.
Unmolding
- Dip your pan into a bowl of warm water (not hot) for about 5 seconds. Repeat if necessary. Take a knife and gently separate one corner from the side of the pan.
- Center your plate or tray upside-down on top of the mold and invert it quickly. My mold came out of the pan so easily and this was the safest method to keep it intact.
You may unmold yours by flipping it onto a bed of lettuce if you want, but I’ve found that sort of bold move works better with molds that have a smaller base surface area. It was just too risky for this loaf shape so I didn’t bother with the lettuce.
If you want to fancy it up a bit you can garnish with fruit or even little cubes of clear jell-O. It turns out that using grapes to garnish the perimeter looked ridiculous, so don’t do that. Oranges would probably look better. Honestly, I think it’s pretty enough on its own so you can skip garnishing entirely.
The Verdict
It turned out looking really nice and had a nice, not overly sweet flavor. But the texture was a little odd with the clear jello mixed with the whip and the occasional piece of fruit. The biggest issue was the layers didn’t hold together very well after slicing, so individual portions really had to be scooped out and piled on the plate. Reviews were mixed, but positive.
If you’ve been following these recipes for a while you’ll already know that I’m not particularly a Jell-O lover. It’s mostly a texture thing, so I tend to lean more toward thick and creamy salads over the really smooth jellies. For that reason I’d say this doesn’t rank among my favorites, but I do like how it tastes.
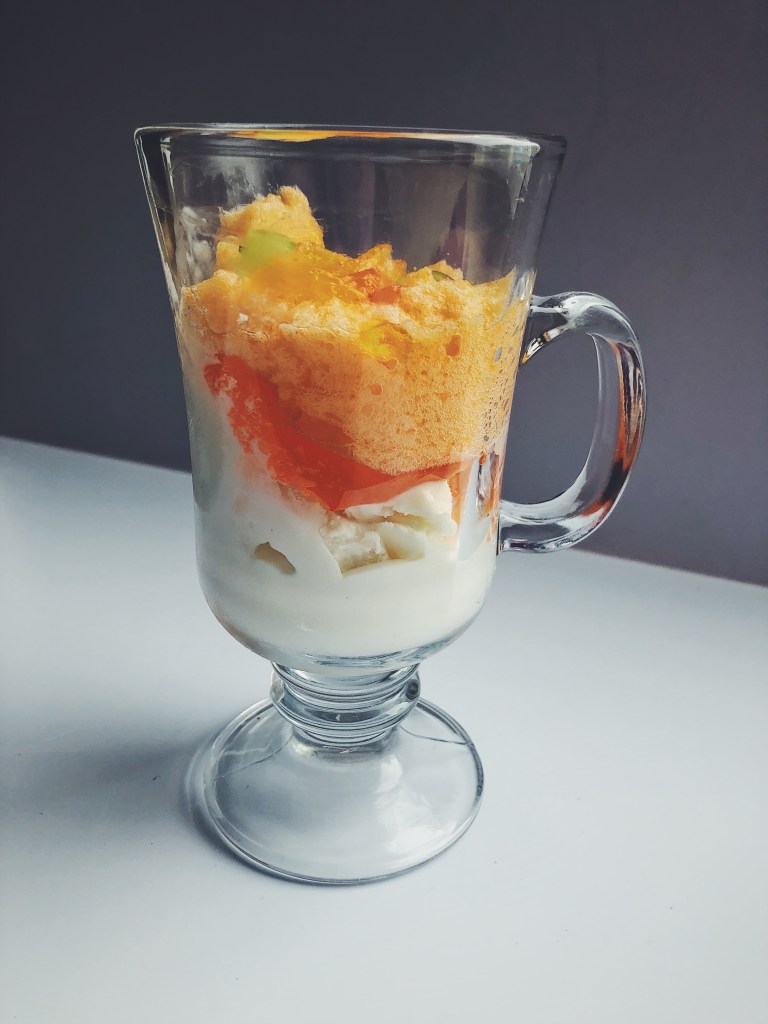
However, since the jello mostly fell apart when I tried to slice it, I decided to serve in a glass over a couple scoops of vanilla ice cream and it is SO good. When you eat it all together it tastes just like a creamsicle.
Overall, it was a fun project with pleasant results! It takes a little bit more time and attention than most of the others- probably around 2 hours, not counting the final setting stage. But if you’re in the mood for a bit of vintage elegance and you feel like showing off a little, this might be a good one to try.
